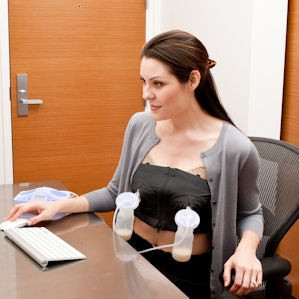
{Photo courtesy of www.simplewishes.com}

{A guest post from Wendy Wright, IBCLC Founder of Lactation Navigation, Workplace Lactation Consultants and The 16 Minute Club - a home-delivery lactation support program focused on helping new nursing mothers meet their breastfeeding goals.}
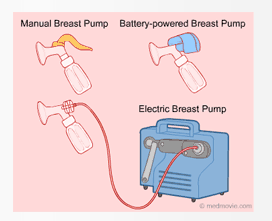
If you will be returning to work after childbirth – especially if you are returning full-time – you will need a high quality electric breast pump for optimal milk removal efficiency and maintenance of your milk supply. Here we talk about choosing a pump, getting used to pumping and what to expect the first week of being a pumping newbie.
Choosing a Pump
To begin with, select a pump that has the following features:
- Double Pump - Benefit: pumps both breasts at the same time for faster emptying and elevated breastfeeding hormones due to double stimulation.
- Fully Automatic - Turn it on and the pumping begins. Avoid more manual pumps that require your hands while pumping so you can eat lunch, do some breast compression to increase output or even get caught up on a few emails while pumping.
- Adjustable Cycles up to 60 times per minute - A healthy nursing baby will suckle 45-55 times a minute. Pumps that cycle close to this range will be the best for maintaining supply. Watch your output (more flow = correct cycle for you).
- Adjustable Suction up to 250 mm Hg negative pressure - Breast pump suction pressures range from 20 – 650 mm Hg negative pressure. Pressures in the high 200s can cause pain; pressures below 150 can be ineffective at extracting milk. Again, study your flow to know the suction that is best for you - experiment daily. You want to be comfortable and relaxed while pumping, not in pain!
Getting to Know Breast Pump Parts
All breast pumps consist of a few basic parts:
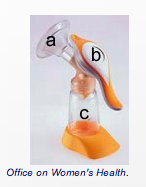
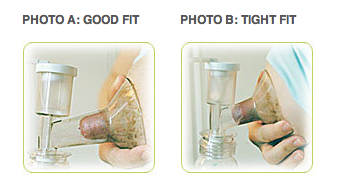
a.) Breast Shields or Flanges – A cone-shaped cup that fits over the nipple and the areola. The correct fit is very important – refer to your manufacturers’ web site and these below to confirm the right fit for comfort and maximal milk supply. (http://www.medelabreastfeedingus.com/tips-and-solutions/13/choosing-a-correctly-fitted-breastshield, http://www.ameda.com/node/749)
{photo care of www.ameda.com}
b.) Pump – Creates the gentle vacuum that expresses milk. The pump may be attached to the breast-shield or have plastic tubing to connect the pump to the breast-shield.
c.) Milk Container – A detachable container that fits below the breast-shield and collects milk as it is pumped. The container is typically a reusable bottle or disposable bag that can be used to store the milk or be attached to a nipple and used for feeding a baby.
Baby Steps: A Sample Pumping Plan for Maternity Leave
Pumping is something that might feel very foreign as you look at all these plastic parts - how do they fit together and how does it work? Believe it or not, you will become accustomed to this odd contraption and might even call yourself a pumping expert in a few months. However, it's important to start with baby steps:
- Begin to practice pumping while you are on maternity leave, ideally when you are relaxed and have some time.
- Don't sweat the amount: The first time you pump, do not be surprised if you only express a small quantity of milk.
- Begin your first pumping session around baby’s 3rd to 4th week of life.
- The first week of pumping: Start early in the week (Monday for example). Select a time that works well for you and your family and pump for 15 to 20 minutes. Amount is not yet important. Store Monday’s milk in your refrigerator. Tues, Wed, Thurs and Friday pump again for 15 – 20 minutes each morning. You are gaining experience and likely volume too. After cooling each day’s milk, you can combine them together to provide one bottle to baby on Friday or over the weekend. No pressure with this suggested plan – you have five days to prepare one bottle and it is best to keep all bottles small – plan to feed one ounce for each hour since baby last nursed well. By beginning slowly with low expectations, we remove the pressure from pumping.
Pumping Particulars
Your body will learn to respond to the pump. Over time your body will be able to express more milk. The time it takes to have a letdown is different between breastfeeding and pumping. On average it takes 52-60 seconds to let down when breastfeeding and just over 3 minutes when pumping (you can help improve letdown time by relaxing, drinking fluids, not watching the milk collecting, looking at photos or videos of your baby or otherwise occupying your mind). When pumping, it is normal for one breast to product more milk than the other. Also, one breast might drip while the other sprays – all if this is okay. Using a breast pump is not a reflection of how much milk your baby normally receives. Your baby’s suck is much more effective than any pump.
Practice, Practice, Practice
Now that you have your pump and are familiar with pumping routines and techniques, it is time for you to practice with your pump before that first day back to work. Good Luck!
To seek breastfeeding and pumping advice or consult with Wendy, please see her website www.lactationnav.com.
milk it, LLC creates Milk It Kit™ - the Back to Work Survival Kit for Breastfeeding Moms. Purchase the Milk It Kit™ and refill milk labels at www.milkitkit.com. Milk It™ and Milk It Kit™ are trademarks of milk it, LLC © 2012. All Rights Reserved.